
Wednesday, July 8, 2020
Sunday, March 1, 2020
Wednesday, July 27, 2016
Get in Touch with your Inner Diva
Sarah's friend made her a Diva Wallet this past winter and we all went crazy for it! We decided to carry the pattern and frames, and they have been super popular. It's a quick and stylish beginner-friendly frame wallet that you can whip up in an afternoon!

The Diva Wallet is a great accessory that you can coordinate with your bag, or use by itself as a clutch. Frames come in silver, gunmental, and rose gold, and it just takes 2 fat quarters or some scraps to make one wallet. Sarah loves her because it holds her necessities AND her phone!
Inside each Diva Wallet is a zippered coin pocket, 2 open pockets for cash & receipts, and 6 individual card pockets. The metal frame closure gives it a polished, professional look. The finished size is 8" wide x 4.5" long when closed and 8" wide x 8" long when open.

We regularly offer classes to make the Diva Wallet. We have one coming up on Thursday, August 18, 2016 at 1 pm. See all the class details and sign up here! If you're reading this post beyond that date you can check our schedule online or give us a call at (561) 447-4147 to see if there is another one soon!
Sunday, July 24, 2016
Embroidered Tea Towels

Personalize your tea towel with a design the recipient will love. There are so many fantastic embroidery designs available for every style and season. A strip of ribbon or fabric gives the towel a lovely finishing touch. (By the way, there is literally a design for everything! I just stitched this llama from Anita Goodesign's Como Se Llama? collection coming out in August 2016.)

We carry embroidery designs from Anita Goodesign and Floriani at StitchCraft, as well as all the accessories you need - Floriani and Madeira thread, stabilizers, tea towels and fabrics for embroidering, etc. Of course your machine does (almost) all the work, so having the right embroidery machine in good working order helps! We're an exclusive Baby Lock dealer, and I can say from personal experience that they are so easy to use and do a beautiful job embroidering! This gingerbread house was my first machine embroidery project, and I had the pleasure of stitching it out on a Baby Lock Destiny. The machine showed me exactly where it was going to stitch and told me when to change threads and what colors to use.

Not sure how to wrap your gift? Roll the towel in tissue paper and twist the edges like a Christmas cracker; put it in a small gift bag; or wrap some baked goodies in it. Even if you hand it to its recipient without any wrapping, your handmade gift is sure to be appreciated!

Thursday, July 21, 2016
Christmas Tree Napkin Tutorial
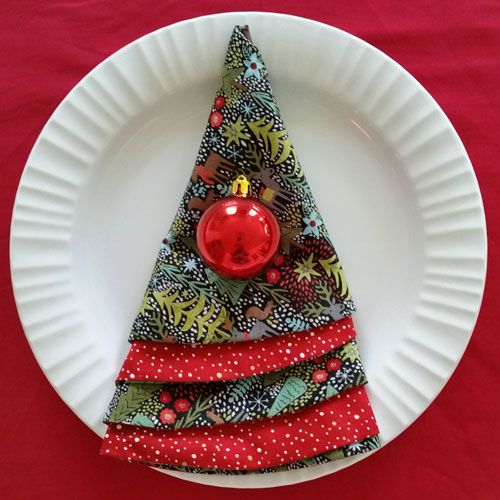
Christmas Tree Circular Napkins are so quick and easy that we thought we'd share a tutorial for making them! Whip some up to decorate for the holidays, for a special dinner party, as a hostess gift, or just because!
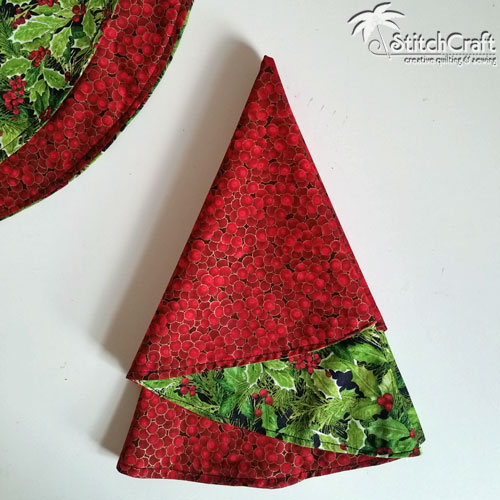
You need 2 coordinating fabrics - 1 yard of each will give you 4 nicely sized napkins.
It's not necessary, but I pre-washed my fabric just in case there was any shrinking or red ink running.
Draw a 16-18" circle on the wrong side of one of your fabrics I scouted around the house to find something to use as a circular template; a serving tray, placemat, large planter, mixing bowl would work. I have a lazy Susan that is perfect! Make sure that you have at least 1/4" extra fabric around your circle for the seam allowance.

Place your fabric right sides together and stitch along the line you just drew, leaving a few inches open for turning. I like to use an open toe foot so I can see exactly where I am going.

Trim the fabric from the outside of your circle, leaving 1/4" to 1/2" seam. You can use scissors or go slowly around using a rotary cutter.
Turn your napkin through the opening so it is right-side out, and press well. Take your time pressing at this point! Use a chopstick or turning tool to get your edges as crisp as possible without poking your stick through.
Stitch the opening closed and/or top-stitch around the edge of the entire napkin to secure.
Repeat for the other 3 napkins (or however many you are making).
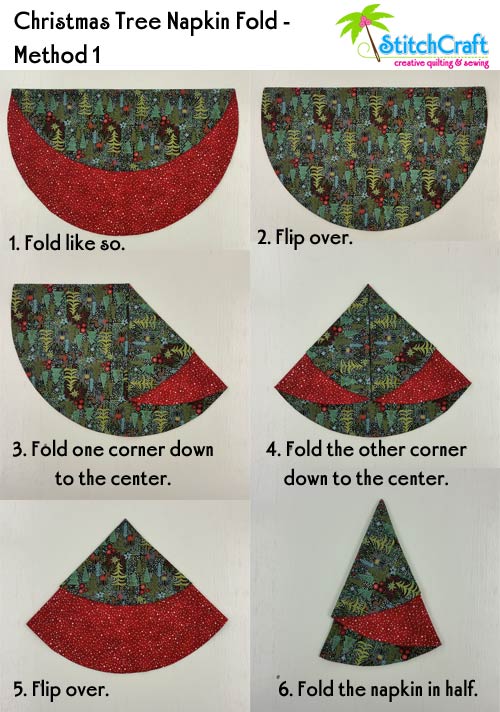
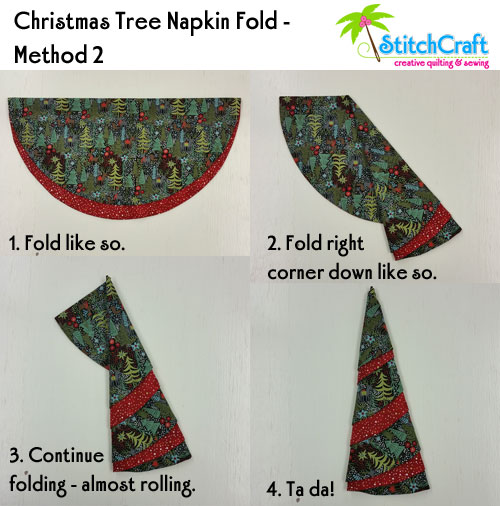
Now fold your napkins! This is seriously the most difficult part - you can play for hours trying to choose the best way to fold it! Here are two ways that I like to fold.
If you would like, you could add ric rac (pom pom ric rac looks great!), lace, or ribbon. If you have a serger you could cut out your circles and serge the edges.
We'd love for you to share any pictures of your napkins with us at the shop or on our Facebook page!
Saturday, July 16, 2016
Quilt an Heirloom - French Braid Tree Skirt
There are some projects that we like to whip up quickly and give to others. It is always a good feeling to give something that we made, even if it didn't take us much time (although the recipient doesn't need to know that!). On the other hand, there are some pieces that are worth more time and effort so they will last for generations. An heirloom.

Raine has been teaching the French Braid Tree Skirt class for many years and each student has created a beautiful quilted heirloom. No two are alike and each one is beautiful. The pattern comes from Jane Hardy Miller's French Braid Obsession.
This pattern works well for so many styles. Jane's samples in her book are super colorful! Raine has made several tree skirts in traditional fabrics as well as bright Laurel Birch Christmas Dogs. Lori's tropical tree skirt (in the photograph above) is in shades of watery blues and features sea turtles. Lime green batik skirts have been stitched alongside soothing creams and golds. One student used French country blues and yellows...she chose to close the circle and keep it as a table topper to use year round! Of course, once you make one...you might find yourself making more for family and friends! (That was the case for Debbie pictured below!)

Raine likes teaching this class because the French Braid technique produces results that look much harder than they are! Plus, she loves how exciting it is for the students to see their sets of braids coming together. She knows that each project is going to be cherished for years to come.
If you would like to take a class to create your holiday family heirloom, the next scheduled classes are Tuesdays starting 8/2/16 and Thursday evenings starting 8/4/16. (You can always check out our currently available classes here.) Find the pattern in French Braid Obsession by Jane Hardy Miller, available to purchase here. We are happy to assist you with choosing fabrics in any palette and combination that pleases you!

Wednesday, July 13, 2016
Textile Pottery --- Fabric-Wrapped Bowls
If you visit our StitchCraft in person you'll notice lots of baskets and bowls made using fabric-wrapped clothesline. They're super handy and can be made in any number of sizes and shapes to hold everything from trinkets and notions to fruits or magazines (or whatever you'd like - as long as you make yours large enough!).
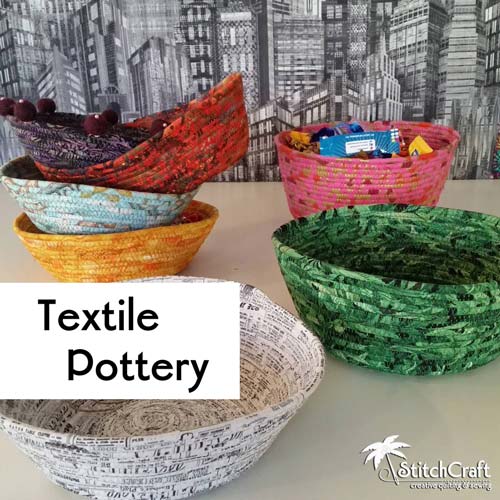
These coiled bowls and trays are as functional as they are decorative. Whip up a bowl to celebrate the season or make one to help keep an area of your desk organized. Of course you could leave it empty and display it as a work of art! Embellish with felt balls, feet, buttons, beads, etc.

It just takes a few hours to make a bowl. Need a hostess or teacher gift? Make a bowl and fill it with chocolates! Quilting bee swap? Fill a bowl with small notions or a few fat quarters.
We regularly offer our class on fabric-wrapped bowls (click here to check our website for current classes; we call it "Textile Pottery.") Tammie teaches a great alternative method to wrapping the fabric that is easier and neater than other techniques.

Once you know the technique you can use it to make bags or other shapes, too! The possibilities are endless!
Subscribe to:
Posts (Atom)